Making your own Yoghurt
Making your own Yoghurt
Making Natural and Greek Yoghurt
Greek Yoghurt plays a huge role in my low carb lifestyle. I eat it at least 4-5 times per week either for breakfast or for a delicious low carb snack, generally served with some berries and low carb muesli. It’s ideal for low carbers because it is higher in protein than natural yoghurt and it is also lower in carbohydrate. Making your own yoghurt gives you even more control over the end result, particularly if you let it incubate for longer, so the lactose/sugars get eaten up (which means even less carbs), and because more of the carbohydrate is drained off in the straining process. Some people who are lactose intolerant can eat a little Greek Yoghurt because of this reason.
Yoghurt is really simple to make and once you taste your own home made version, it’s hard to go back to the store bought versions. I probably make a batch of yoghurt every 2 weeks. It is quite simple to make, so excuses about not having enough time are unwarranted. Note that you can make the yoghurt without straining it and it would simply be natural yoghurt. To then create Greek yoghurt, you simply strain the natural yoghurt to get rid of the whey.
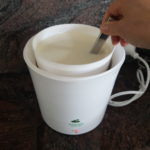
The recipe I am going to share with you today uses a yoghurt maker, which essentially keeps the yoghurt at about 40 C/104 F. This is ideal for incubating your yoghurt and encouraging the growth of all of that wonderful healthy bacteria that your gut loves. I am not interested in using jars and warm ovens/towels to create yoghurt, as it just makes the process more difficult and time consuming, and let’s face it, keeping it simple means you are more likely to make it a part of your life.
In Australia, a decent yoghurt maker can cost as little as around $30-$50, and in my view, that is money very well spent. I have got my money back ten-fold based on the amount of yoghurt that I have made, especially when compared to the price of buying quality Greek Yoghurt. I even managed to source a yoghurt maker for a friend second hand for $10, so if money is an issue keep an eye out for a second hand one.
Making your own Yoghurt
Equipment and Ingredients
To get started you are going to have to buy your electric yoghurt maker, as well as some culture and if you are interested, a probiotic as well. I sourced all of these items from www.greenlivingaustralia.com.au initially. I still try to buy my freeze dried culture and probiotic from them but you can also buy them from other sources, ie, in Australia, Mad Millie make a yoghurt culture, plus you can source them in kitchen shops, specialty shops and on line. Adding a probiotic to your yoghurt is a great way to introduce probiotics into your life. Buying sachets of probiotics from companies such as Green Living Australia also makes it a really cost efficient way to source your probiotics.
Click on the links below for links to Green Living Australia’s yoghurt maker, yoghurt cultures and their probiotic culture. I suggest you do some research online for other suppliers of these products.
https://www.greenlivingaustralia.com.au/yoghurt/cultures/yoghurt-cultures
https://www.greenlivingaustralia.com.au/abc-probiotic-culture
https://www.greenlivingaustralia.com.au/yoghurt/electric-yoghurt-maker
What Milk Should You Use
To make your yoghurt, you are also going to have to decide if you want to use UHT milk or fresh milk. You can use either normal milk or organic milk, both of which are available in UHT form as well. A couple of things might influence your choice of milk. One is money and the other is time (and laziness!!) as UHT milk is the simplest milk to use to make yoghurt, as you simply use it as it is. Pasteurized milk always needs reheating and cooling prior to use. Using UHT milk means that you can have milk on hand all of the time. I make sure I buy UHT milk every time I go shopping so I can always make yoghurt when it’s needed and the milk is sitting in my pantry. Organic milk is ideal to use but it may not be within your budget, don’t despair though as standard milk still makes amazing yoghurt.
Why do I need to heat fresh pasteurized milk again?
The original pasteurization of milk kills the natural milk bacteria which means that other bacteria that aren’t so good for us can grow in the milk, even if we add a yoghurt culture to the milk. The bacteria will compete for the sugar/lactose in the milk and the unwanted bacteria can overrun the desired yoghurt bacteria. This is why pasteurized milk has a limited shelf life, even when it has been refrigerated. The other thing that it does is that when heating the milk for a second time, denaturation alters the original structures of the milk and this can enable us to produce a thicker yogurt.
Using Freeze Dried Culture or a Mother Culture
Now you may have heard of people using a couple of tablespoons of a purchased yoghurt (I call this ‘mother culture’) to create their own yoghurt instead of using a freeze dried culture. I do occasionally do this, especially if I don’t have any freeze dried culture at home. The thing to remember is that commercial/store bought yoghurts are generally bred for rapid, consistent fermentation and are also designed for consumers to eat and that is the end of the yoghurt journey. They don’t expect nor design their cultures to survive intact for long in a fridge nor are they designed to be used again and again to make another batch of yoghurt. If you ever use a commercial yoghurt (‘mother culture’) then make sure it is no older than 1 week old and remember that it may not work after using it for 3-4 batches, as the lactose/food can diminish which means it may not be able to create quality yoghurt.
I would much rather use a consistent and credible freeze dried culture to make my yoghurt so that the yoghurt I eat is full of good bacteria. Also, there is nothing worse than checking on your yoghurt after 8-12 hours of incubating and discovering that it hasn’t worked and having to throw your milk down the drain. All the more reason to try to use a freeze dried culture if possible.
Hygeine
Note that you have to be very hygienic with your culture and make sure it is sealed well and kept in the freezer You can store it in the fridge but it lasts much longer in the freezer. I seal mine up and store it in a small zip lock bag or in one of those sterile wee containers (yes…wee containers.) If you have any probiotic powder, generally you can treat it exactly the same as the yoghurt culture and seal and store it in the freezer, unless another storage method is recommended on the packet.
Label Your Cultures
Make sure you label your cultures as it is easy to get them confused, especially if you have a probiotic as well. I recommend you date them as well. Note that the packets of cultures generally have a yield of about 100 litres/100 qts, which is a lot of yoghurt. Make sure you read the instructions on your cultures to make sure you are using the recommended amount. Adding additional culture over the recommended amount is not recommended either, and can actually result in your yoghurt not setting. More is not better and won’t result in a thicker yoghurt.
I will not bother discussing low fat options for yoghurt (umm……this is a LCHF blog!!!) so this recipe is going to produce a yoghurt that is rich, creamy and absolutely delicious. You could of course use low fat milk to replace full cream milk to make yoghurt but from a quality and taste perspective, why would you??? I am also going to base my recipe on using 2 litres/ 2 qts of milk as that is the size of my yoghurt maker, and trust me, this yoghurt is never going to go to waste. Simply adjust the amount of milk you think you will need and reduce the amount of culture by the same amount. ie for 1 litre/1 qt use 2 Tablespoons of ‘mother culture’ or the amount specified on the packet of your freeze dried culture, which generally is based on one litre/1 qt of milk anyway.
Fresh Milk
The only slightly complicated process when making yoghurt is deciding if you want to use fresh milk or UHT millk. Fresh milk will always need heating and then cooling down to an ideal temperature so it won’t destroy the bacteria in your starter. If you use UHT milk then there is no need for this process and the milk can be used straight from the container. Heating the milk changes the protein to make it more conducive to making yoghurt with. As mentioned previously, it also kills off any bacteria that is growing in the milk and might compete with the yoghurt starter culture.
Potential Issues With Yoghurt Not Setting
1. Your starter culture was exposed to a temperature over 43C (110F).
2. Your yogurt container was not sterile enough- note that this doesn’t mean it has to be sterilised but just extremely clean and dry. I clean mine in our dishwasher and just make sure there is no sediment left in the container.
3. Your starter culture (or mother culture) is old or out of date. You won’t know this until your yogurt fails. If you use a store bought yogurt as the culture and it’s been made with a ‘direct set’ culture then they can run out of food after three or four batches.
4. The incubator temperature was not high enough. If the milk cools down too much before the yogurt has formed, then the yogurt bacteria will struggle to grow, and the milk bacteria can multiply more quickly than your culture which will kill it. This is why fresh milk needs to be pasteurized as well. Most yoghurt makers have a set thermostat so you shouldn’t have to worry about this.
5. You may have used too much culture. If there is too much culture, the bacteria will be fighting over the food (lactose) which could potentially run out before the yogurt sets. 2 tablespoons of fresh yogurt is generally enough for a litre/34 oz of yogurt or follow the instructions on the packet of culture that you buy.
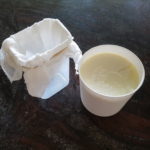
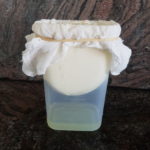
Equipment for straining your yoghurt to make Greek yoghurt
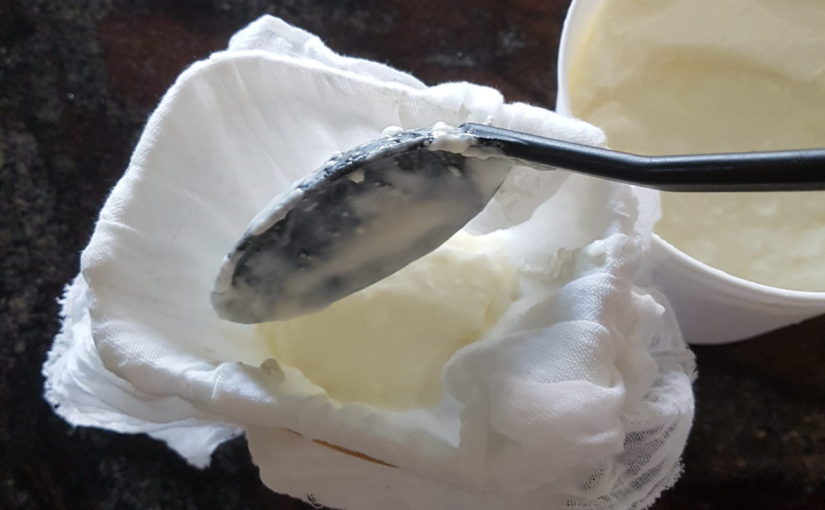
You can buy special equipment for straining your yoghurt but I make do with a strip of muslin cloth. You can buy this by the length from any fabric store. Simply cut the muslin into practical lengths that will suit the size of the container you will use to strain your yoghurt. As long as you rinse and wash your muslin cloth out really well after each use and dry it thoroughly before use, then you can reuse your cloth over and over again. I occasionally soak it in bleach and make sure that I wash it in water hotter than 60 C/ 140 F after each use. Drying it in the sun can be beneficial as well.
The container that I use to drain the yoghurt in is a large plastic container that will hold the amount of yoghurt that needs straining. If all of the yoghurt won’t fit, sometimes I simply allow some of the whey to drain and then top it up with more yoghurt. Just make sure that the yoghurt is not sitting in the whey. You may need to drain the excess whey off to ensure this doesn’t happen. I use a really thick elastic band around the top of the container to ensure that the muslin stays in place- see the picture above which illustrates this.
Good luck with your yoghurt making ventures if it is something you are interested in doing. I’d love to hear from you if you do get to make your own.
Kxx
Ingredients
- 2 litres full fat milk of choice-UHT or fresh see notes
- 1 speck yogurt starter
- 1 speck probiotic optional
Instructions
CHOOSE YOUR MILK OPTION
- Pasteurised/Fresh Milk OptionHeat 2 litres/2 qts of milk almost but not quite to boiling point (or use a thermometer), where the milk will start to froth on top. 180 F or 80 C and then allow it to cool on its own in the fridge or actively try to cool it with a cold bath etc down to about 40 C/104 F, if you want to use it straight away. If the temperature is too warm it will kill the culture so be precise. The milk can be cooled down completely.
- UHT Milk Option Simply use the milk straight form the UHT carton with any need to heat and cool the milk.
MIXING THE YOGHURT AND THE INCUBATION PERIOD
- Make sure that your yoghurt maker incubation bowl is thoroughly clean and dry. Add a speck (a tiny amount) of yoghurt culture or follow the culture's instructions (and a speck of probiotic if using as well) to the bowl and add about a cup of your desired milk and blend really well with a very clean, spoon or whisk. Note that if you wish to use an existing 'mother yoghurt' you would blend about 4 Tablespoons (4 Tbspns to 2 litres/ 2 qts of milk) of the older 'mother yoghurt' with the cup of milk, instead of using the culture. Remember my points on the limitations of this though as mentioned in the article above supporting this recipe. Finally, simply add the remainder of the milk, whisk again really well and turn your yoghurt machine on.
- You need to decide how long you want to incubate your yoghurt for. I like to incubate for approximately 10-11 hours as this means that most of the lactose (natural milk sugar) is eaten up in the fermenting process which means a lower carbohydrate yoghurt at the end. You can incubate it it for anywhere between 8 and 12 hours.Note that your yoghurt will have a more sour taste the longer you incubate it for but even at about 11 hours this is not an overly sour yoghurt, so don't let this deter you from a longer incubation.
- After the desired amount of time, simply remove the container from the incubator, place in the fridge and allow it to cool down completely. You now have natural yoghurt which can be eaten simply as it is.
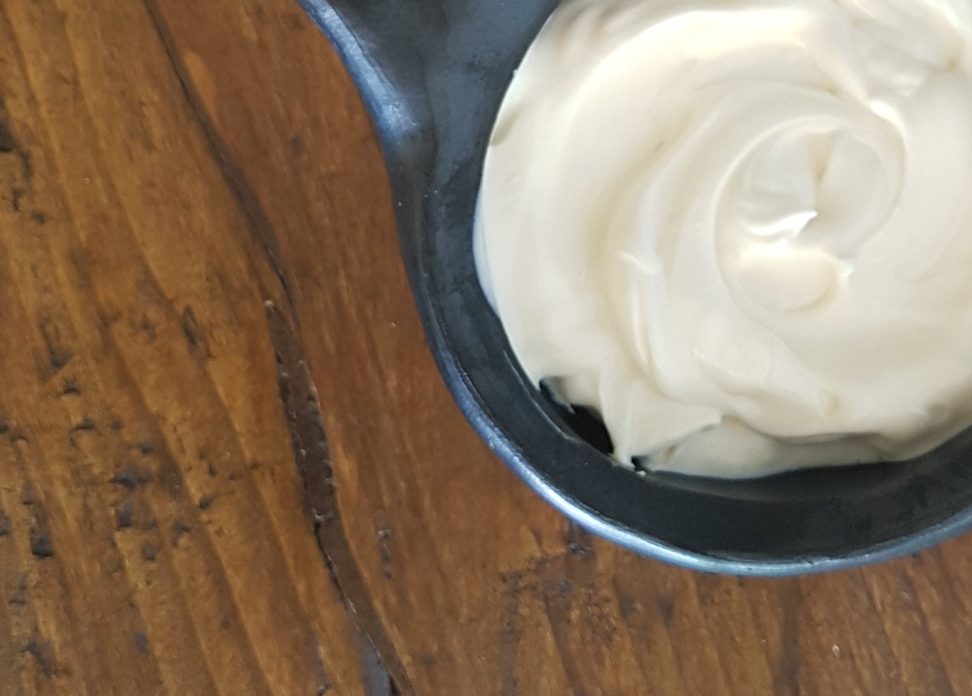
- To create Greek yoghurt (the absolute ideal yoghurt for a low carb low sugar lifestyle) from this natural yoghurt, you have one further step to take, and that is to strain your yoghurt.
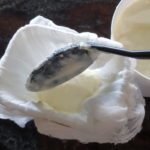
MAKING GREEK YOGHURT BY STRAINING IT
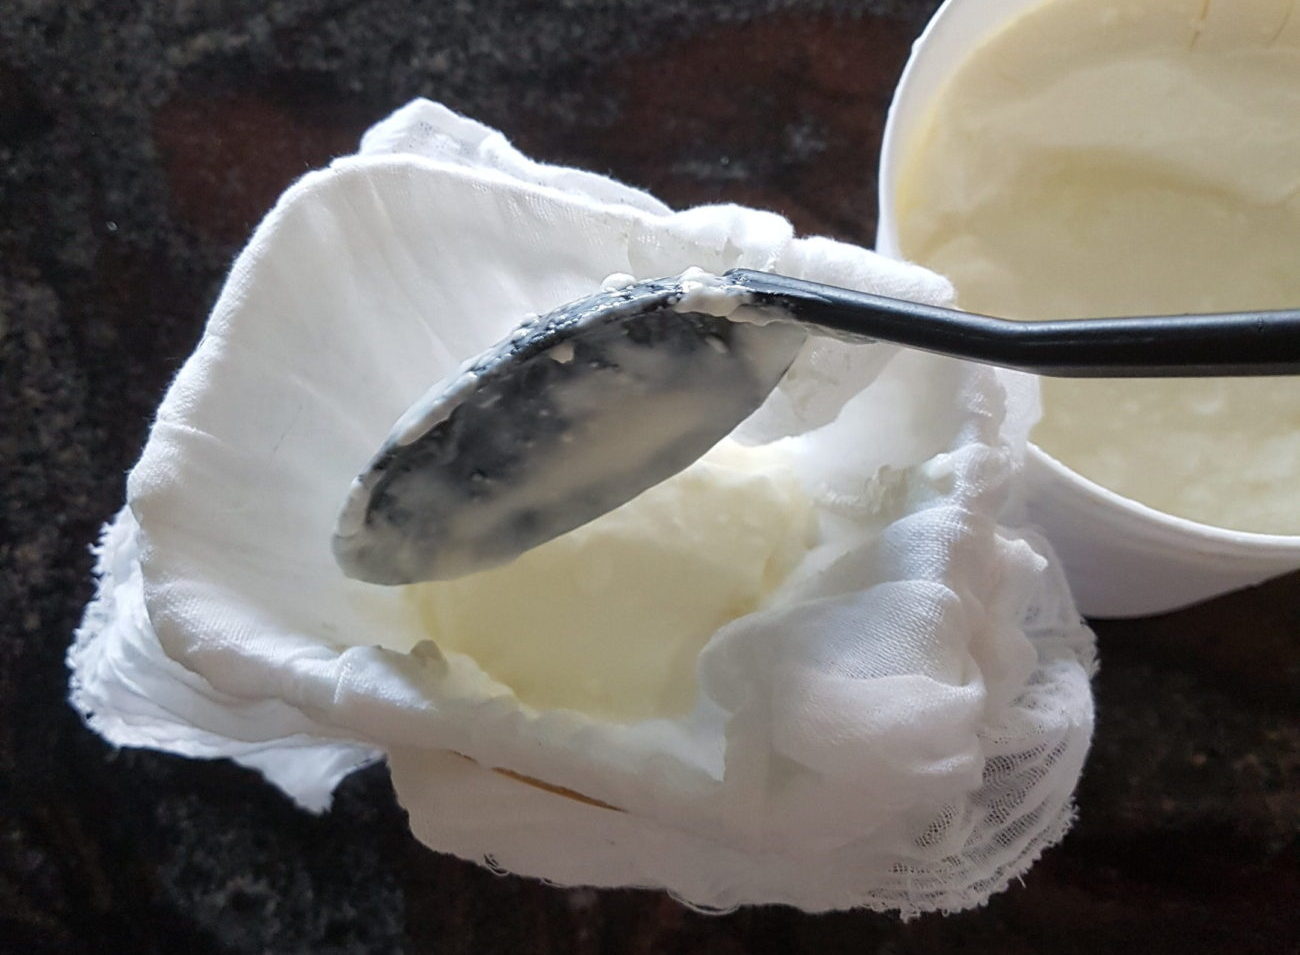
- After refrigerating the natural yoghurt for a couple of hours until it is cool, prepare to drain the yoghurt in the fridge. Very carefully pour the yogurt into a muslin straining cloth over a container to catch the whey. You may have to empty the whey if it starts to creep up near the base of the cloth. You can strain the yoghurt for as little as 1-2 hours which will remove approximately 20-30 % of the whey or if you leave it for about 4 hours it will remove approximately 50% of the whey. I often leave it for about 4 hours. You can drain it for up to 10-12 hours. Check the consistency of the yoghurt every now and then and stop straining when it reaches the consistency you like. You can beat additional whey back into the yoghurt if you feel it is too thick.
- The yield is dependent on how much whey you strain from the yoghurt. I generally get approximately 1.2-1.5 litres/ 1.2-1.5 qts of yoghurt to 2 litres/2 qts of milk. Store the yoghurt for approximately 1-2 weeks in the fridge.
MAKE LABNEH OR YOGHURT CHEESE
- To make the yoghurt into rich, thick labneh cheese (yogurt cheese), simply follow the instructions for making Greek yoghurt. Blend a squeeze of lemon juice and a pinch of salt into a cup of Greek yoghurt and stir through.Let the yoghurt strain again in muslin cloth for anywhere between 12-24 hours in the fridge. 12 hours will create a slightly softer cheese. You can leave it for longer to make a stiffer textured labneh. Note that you can do this from the Natural yoghurt in the first step as well but you will need to strain it for labout twice as long and your yield will be less as well, as more whey will drain from the yoghurt.Store labneh for approximately 1-2 weeks in the fridge.
USING LEFT OVER WHEY
- Whey is the product used in WPI powders and is full of nutrients. It can be used to make soups and casseroles if you don’t want to waste it. It can also be used in place of water to make sour dough. I often use it when I make my own dog food or simply add it to my dogs water or you can use it to water your garden. It can be frozen to use at another time as well. Don’t forget that you can also use a little whey to ferment your mayonnaise so that it will last for around 3 months instead of only a couple of weeks.
Nutritional Information
9 thoughts on “Making your own Yoghurt”
Comments are closed.
might look at this next spring when weget home..
I think you will enjoy making your own. The good thing about it is that you can adjust how thick you make it depending on how long you strain it and if it’s too thick, simply add some of the whey back into the yoghurt.
I make the Greek Yoghurt regularly, it’s the best!
Thanks for the feedback Anna. You can’t go back you store bought once you’ve eaten it.
I make the Greek Yoghurt regularly, it’s the best!